
Transaction Management
View payment history, generate X/Z reports, and manage cash drawer operations
Use Transactions to review available order and cashbook records, payment details, and summaries for a selected period.
Review draft: These instructions were checked against local application source but have not yet been verified on the current US QA build. Available records, actions, and report contents depend on access, device configuration, and region.
Find a transaction
- Open Transactions from the POS navigation.
- Choose an available date or range and check the period shown.
- Select a record to inspect its details. Depending on the record, details may include an order, payment status, amount, receipt information, or a cashbook entry.
Scroll across the screenshot to see all four markers.
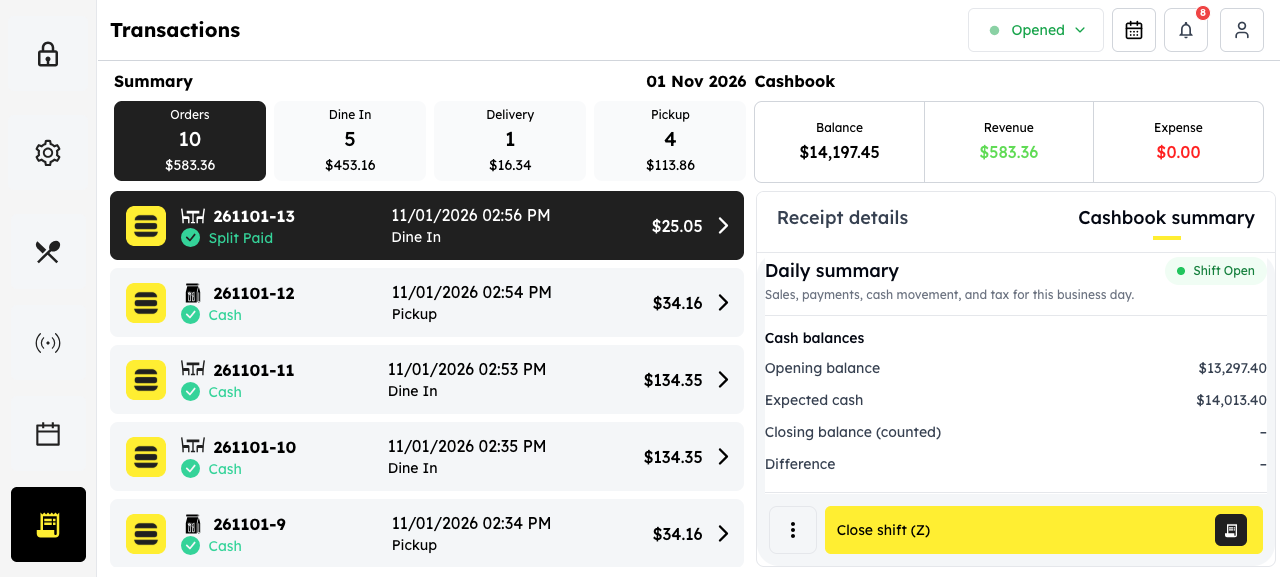
US QA example from November 2, 2026. Use it to locate controls; the test figures are not a reference for reconciliation.
- Transactions: Choose a record to inspect its details.
- Date control: Check the period you are reviewing.
- Cashbook summary: Select this tab to review the available summary.
- Cash balances: Review the opening, expected, and counted amounts shown.
If Transactions or an action is unavailable, ask your manager to check your access and device configuration. The list and summary show the records available for the selected context; do not assume every order or payment is included without checking.
Check payment and cashbook details
Review the amount, payment method, and payment status shown for each relevant record. An order's source or completion status alone does not prove that payment was collected. EC Cash and an integrated card terminal can use different workflows; check the actual method and result for the order.
A transaction-list amount can reflect an adjustment, such as a partial refund. Inspect the relevant payment and refund details rather than treating every list amount as the original total.
The cashbook can include cash movements such as revenue, expenses, and bank deposits or withdrawals. Use the labels and totals shown for the selected period. If a value is unavailable, do not treat it as zero; ask your manager or support to help reconcile it.
Record a cash movement
If you are authorized to record a cashbook entry, follow your restaurant's accounting procedure:
- In Transactions, select Revenue for other income, Expense for a cash expense, or Balance for a bank movement.
- Choose the category and enter the requested date, amount, tax, and comments. For a bank movement, choose Deposit into Bank or Withdrawal from Bank as appropriate.
- Review the details and select Save. Saving creates or changes a financial record.
Check any prefilled tax value against your restaurant's instructions. These steps come from the local application source; the controls and entry workflow still need current US QA verification.
Review reports
The summary can provide an X report for reviewing a period and a final Z report for closing. Report options, output, and tax labels vary by configuration and region; do not assume that selecting a report automatically prints it.
Before creating a final Z report, follow your manager's closing procedure. The app can finalize and archive a shift that cannot be reopened. Verify the device, period, cash count, and on-screen warning before confirming. If anything is unclear, stop and ask your manager or support.
Investigate a discrepancy
- Confirm that you are viewing the intended restaurant, device, and period.
- Compare the displayed payment and cashbook records with your restaurant's supporting records and actual cash count.
- Note the transaction, amount, time, and discrepancy; follow your manager's procedure rather than creating a corrective entry without authorization.
- Contact support if the difference remains unresolved. Avoid sharing unnecessary guest information.